Podcasting first came about in the early 2000s. The name is a portmanteau of “iPod,” a music-only precursor to today’s Smartphones, and “broadcasting,” the technology by which TV and Radio reach receiving devices.
If you’re making a podcast for a course assignment, you’re going to need some hardware and some software – but the nice thing about podcasting is that you probably already have (or can easily get, for free) everything you need to do it. If you have a working Smartphone, a computer, and an internet connection, you can make your own Podcast!
To make a podcast the quick-start way, all you have to do is prepare your tech, write your script, record your audio, edit your audio (including adding a “music bed”), and publish!
What’s So Great About Podcasts?
Podcasts take a LOT of different forms, so you have tons of versatile examples to follow. Traditional news outlets like NPR and the BBC produce podcasts. Other investigative podcasts take a more in-depth storytelling approach, like This American Life or Radiolab. There’s room for fiction and storytelling too – just consider Welcome to Nightvale! And some podcasts are off-the-cuff, unscripted, and funny, like Comedy Bang Bang!
Podcasts can be serious, funny, dramatic, sad, informative – anything that you can do with writing, you can do with a podcast. Plus, podcasts are portable! Because podcasts are an audible medium, they can be “read” by anyone with a Smartphone, and they can be enjoyed while walking, exercising, and even while driving.
Starting Your Podcast – Step-By-Step
For this quick-start guide, we’re assuming that you’re producing an audio essay –styled podcast, like a story you’d hear on 99% Invisible or including interviews like Pod Save America. Your purpose is very much like that of writing a conventional essay: to research and gather evidence, and then to inform your listener about what you’ve learned.
Free-form interview podcasts, like Fresh Air aren’t so carefully scripted, and conversational podcasts like My Favorite Murder and How Did This Get Made are a hybrid between a scripted podcast and an interview podcast. All podcasts must be edited for best effect.
To create a Podcast, you’ll need to prepare your tech, write a script, record your audio, edit your audio, and publish your podcast
Step 1: Prepare your Tech
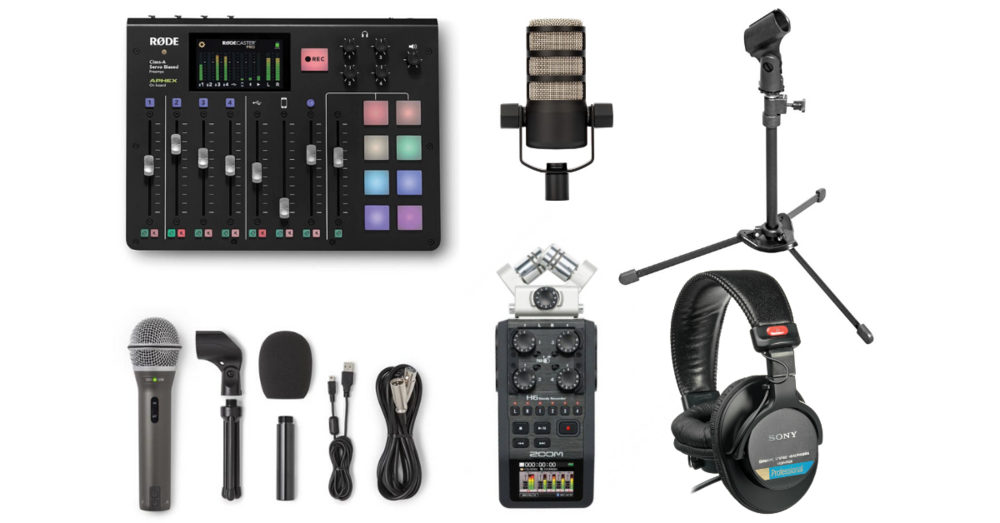
Visit the Digital Writing Studio to access podcasting equipment.
Before you start, you should make sure you have a quiet space to record any segments that need good sound quality OR which are not recorded “in the street.” A nice quiet room with no chance of outside disturbance is probably fine. To reduce background noise and echo, make sure no unnecessary electronics or devices (like fans) are running, and try to “insulate” your recording environment – recording in a carpeted room, closing the curtains, and even hanging blankets on the walls can help to reduce buzz and static.
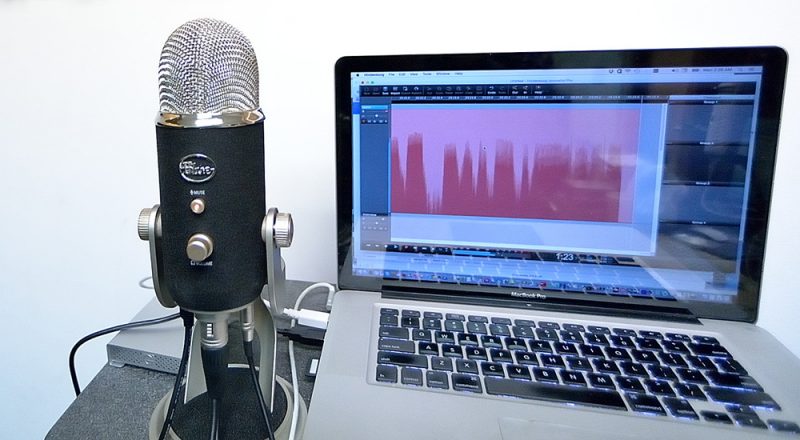
You will need a recording device. If you don’t have a dedicated digital recorder or similar high-end audio setup, you can record using your phone. You can also use your computer’s microphone, or plug an external microphone directly into your computer. Make sure you have enough memory to store your audio files, and make sure you know how to transfer audio files from your device to your computer.
You will need a computer to edit your audio. It’s true that audio recording apps for Smartphones are increasingly sophisticated, and if you wish to explore those options for making your podcast, you should – but this tutorial assumes you are using Audacity to edit your podcast.
To follow this tutorial, make sure you have a copy of Audacity on your computer. Audacity is a free and relatively robust sound editing app that’s perfect for podcasters new to the medium (and on a budget!).
Finally, you’ll need hosting – often, if an instructor requests that a new –media assignment be completed as a podcast, you won’t need hosting: you’ll simply upload an audio file just as you’d turn in any other assignment. If you do need to have your podcast online, talk to your instructor – they may want something as simple as uploading your audio file to a site like Soundcloud, or they may need you to create a Buzzsprout account (or similar). For this tutorial, we’ll show you how to upload your file to your own personal FIU MyWeb WordPress page.
Step 2: Write Your Script
Again, this tutorial assumes that you are performing an audio essay – an essay written and read by you with audio accompaniment. You may wish to include sound effects, live interviews, and other audible edits, and you’ll need to script around those once you’ve recorded your audio (step 3).
We assume here that you have something to write about – either you have a topic which interests you, or your instructor has assigned you a topic. If you’re having a hard time thinking of something to write about, we recommend scheduling an appointment with the FIU Writing Center, or collaborating with your instructor or classmates to come up with ideas. Once you have a topic, writing a script for an audio essay is a lot like writing the essays your used to, but with some exception:
- We expect podcasts to be less formal and more intimate. You, the author, often feature prominently and many podcasts have a “testimonial” quality – we want to see your connection to the topic.
- Podcasts often include breaks or lulls, opportunities for the listener to think about what they’ve just heard.
- Podcast scripts should be written in short segments – just one or two sentences to a paragraph. This
- makes it easier to clean up and re-record any “flubbed” lines.
If you are writing a script that includes sound effects, recorded interviews, or any audio other than what you yourself will read aloud, you should make notes in your script to indicate where sounds are going to go. For example:
“…And on that night, Maria got behind the wheel of her car, and drove away.”
[SOUND EFFECT: CAR DRIVING AWAY]
“On her way home, Maria passed by a party store – she saw smoke rising from the top, and flames in the windows. She called the fire department. “
[SOUND EFFECT: SIREN]
Step 3: Record Your Audio
In your quiet room with your script in-hand, it’s time to record!
Before you start recording your audio, read through your script aloud a few times. Get a feel for where there are hard-to-pronounce words. Where do you run out of breath? Is there anything that doesn’t sound right to you? Now is the time to make changes.
Most people read way too fast when recording themselves – breathe, slow down, and think not just about what you are saying, but how you are saying it.
Practice inflecting – smile when you say happy things, frown when you say sad things. Think about whether or not what you’ve read should sound like a question, a declaration, or something else.
If you make a mistake, it’s usually best to re-read that section. That’s why we script our podcasts in small chunks – if we mess up, we can just read that section over without having to go back and re-do a whole page.
- This tutorial assumes that you “get it all in one take,” which isn’t entirely realistic – but to make a good take from multiple takes, you’ll need to practice your Audacity skills. You can learn more about using audacity through the Audacity & Podcasting page and the Video Tutorials linked to on the Digital Writing Studio website!
Once you are finished, play back what you have recorded. Remember that if you like some of what you’ve recorded, but not all of it, you can keep the good parts and re-record the bad parts in the editing stage, below.
Once you have a good read-through (or once you have enough good bits to put together from multiple read-throughs), transfer your audio files to your computer. Put them in an easy-to-find place – a folder on your desktop or somewhere you know you’ll be able to locate them as-needed.
Step 4: Edit Your Audio
So now you’re sitting at your computer, all files transferred to a folder called “My Podcast” or something like that, and you’re ready to make this collection of audio recordings into a podcast.
We recommend backing up your audio files now – some of what you’ll do in Audacity can’t be un-done easily. If you have to start over, or if you lose an audio file, you’ll need a backup to recover your work.
Open Audacity and select File -> Import -> Audio
Choose your recorded audio from the file you created when you imported your files from your recording device to your computer.
You now have your first “Track” – go ahead and push the “play” button, and you should hear what you read earlier.
Now, go back to File and once again Import -> Audio
Select some music to make your music bed – this is simply music, usually instrumental music, that plays “under” your spoken performance.
- PROTIP: There is plenty of royalty-free music available online. We like the wide selection available from Kevin McLeod’s INCOMPETECH site!
Selecting a song will automatically create a new track. Go ahead and push play again – you should hear your voice and the music at the same time!
Turn down the music – using the – / + slider to the left of your music track, adjust the volume so that the music sounds like it’s “playing in the background” – you want your listener to hear your voice. The music should not be the main focus.
You’re almost done. Find the end of the first track – the end of your speaking part. Your music bed is probably longer. On the music bed track, highlight everything to the right of where you’ve stopped talking. Then, click the scissor icon (or press the “delete” key) to cut out the extra music.
Save your project by choosing File -> Save. Audacity will warn you that what you’re saving is a project and not an audio file – that’s fine. Just save the file so that you don’t lose it.
Now, export your project to create an audio file. Choose File -> Export and then choose the file type you’d like to create. We strongly recommend MP3 as it is easily playable by all media players, and it creates relatively small files as well.
That’s it – you’ve recorded an essay with a music bed. You’ve made a podcast!
Step 5: Publish!
If your instructor simply wanted you to make a podcast-style new media writing project, you can send the MP3 file you’ve created directly to them – ask your instructor how they’d like to receive the file. They might ask you to upload it to Canvas, or they may simply tell you to email it.
However, if your instructor wants something closer to a real, hosted Podcast experience, make sure to find out where they’d like your project hosted. It may be a simple matter of creating a Soundcloud account (or using an existing one) and sharing the file out from there. Alternately, they may ask you to use a dedicated hosting service, like Buzzsprout or Simplecast.
 |  |  |
If you simply need to post your file online, we recommend using your free FIU MyWeb wordpress site to host your project. Once you log in at MyWeb.fiu.edu, you will see a link to “Media” on the left-hand navigation. Highlight that link and choose “Library” when it pops up.
In your Media library, click the “Add New” button. Browse to your newly created MP3 file and select it.
Your Podcast will upload to your FIU MyWeb media library. By clicking the icon for that podcast, you will be taken to an in-browser player, and you will see to the right a text box labeled “File URL.” Copy that address, and you now have a link you can send your instructor.
Congratulations – you now have the first episode of YOUR podcast available on YOUR FIU Website!
What’s Next?
This has been a very brief overview on how to create an audio file that is like a podcast. In reality, you’ve created an audio essay with a music bed and shared it with your instructor. An actual podcast should be hosted on a podcasting site which allows users to stream it or to download it through an RSS feed.
If you enjoyed making your own podcast episode, you should consider sticking with it. Podcasts have all the flexibility of a blog, but also allow for a more creative and entertaining author-listener interaction. You can pause for effect, add sound effects, tune in to music together, and deliver your writing the way you want it to sound.
And if you ever want to get more out of your Podcast, or if you’re just looking for tutorials, published student work, or anything else related to digital writing, come back to the FIU Digital Writing Studio any time.
Happy Podcasting!